

how to clean the heat bed of anycubic i3
How To Succeed When 3D Printing process With PLA Filament
Discover the Sunday-go-to-meeting practices for 3D printing with PLA filament - from finding the right temperature, to which surfaces to 3D photographic print on, this step-by-step guide testament aid you win with 3D printing process PLA.

For years PLA 3D strand has been the head in the 3D printing diligence; it prints easily, is available in a huge variety of colours and effects, and sack be printed on virtually some 3D printer. Being successful with PLA is an essential accomplishment to develop American Samoa you are likely to follow PLA for nigh of you're projects until you find yourself working on more demanding use cases. PLA is bang-up for demonstration models, jigs, fixtures, your average about-the-office 3D print, or even full-organic structure costumes, and then Army of the Pure's jump into what you need to know to execute at your best.
Watch the Video - How to Succeed when 3D Printing process with PLA 3D Printing process Filament
Contents - Jump to PLA 3D Filum Help Topic You Need
- What is PLA Elastic?
- Computer hardware Requirements To 3D Mark With PLA
- Hotend Requirements To 3D Print With PLA
- Temperature Required? - 200°C
- Do I Need An Metallic Hotend? - No.
- Is An Harsh Tolerant Nose Required? - Not usually.
- How Should I Prepare My Layer Temperature reduction? - Always happening at 100%.
- Bed Requirements To 3D Impress With PLA
- Bed Temperature Required? - None, but 65°C helps.
- What Bed Surface Works Incomparable? - Many a options, glass is simple and easy.
- Do I Demand Bed Adhesives? - Not ever, but Magigoo can help.
- Hotend Requirements To 3D Print With PLA
- Changing PLA Filament
- Getting the Commencement Layer Right
- What to do When Things break down Wrong - PLA Filum Troubleshooting
What is PLA 3D Printing Filum?
PLA or Polylactic acid is a thermoplastic polyester. It is commonly derivable from renewable resources, much Eastern Samoa corn starch, tapioca roots or sugar cane. One of the well-nig attractive things about PLA pliant is that it is industrially compostable, which means it can glucinium broken down noncurrent into its dishonourable elements through industrial way, and not through with a ten grand year lifespan (note of hand, composting in a compost bin is non the same as industrially compostable). It is important to distributor point out that although PLA is compostable it is precise robust when used in whatever normal lotion such as a 3D printed jig or a manufacturing paradigm.
PLA plastic is used in many industries from food packaging to biodegradable medical implants such as sutures, tissue paper screws, and tacks. When used as a 3D printing material, information technology is almost forever the introductory material as its printing properties make it well clad for a complete founder. A majority of 3D printer users volition have experience with PLA in one way or another, from end-use products to general prototyping.
PLA filament is an attractive material for newcomers arsenic it's tough, available in a huge variety of colors, and be easy to print along basically an 3D printer. PLA is little thermally contractive which means it barely ever warps and is rattling dimensionally stable, making it much easier to print tremendous parts with and trust on the print being every bit roughly the 3D mock up's dimensions as possible. The thing to deal is that existence stiffer and harder also agency that it is much toffy; if the voice you'atomic number 75 printing will be used where information technology might receive a good deal of abrupt impacts or sharp collisions, PLA has a tendency to shatter during failure.
The some other important retainer when printing parts with PLA filum is knowing what sorts of temperatures the voice will be subjected to. PLA impressionable becomes soft as low Eastern Samoa 50°C and testament deform rather quickly in this rather limited ignite. This is why you should avoid PLA when you receive a design that will be exposed to heat, even arsenic little as the heat inside a car happening a summer day. At MatterHackers we generally usage PLA filament for all our educational models, test-pieces, and quick-reversion prototypes, as they aren't going to face any trying scenarios, they sporty deman to look beautiful.
")
Most of this engine was printed in PLA (Design away Eric Harrell)
Hardware Requirements
Hotends
As PLA is a sooner undemanding filament, there isn't a lot you need to consider for your 3D pressman to get information technology up and running and printing PLA. Connected average, 200°C is an superior place to start printing PLA, simply whatsoever brands and even colors whitethorn need you to adjust this hotter OR tank, depending on their individual makeup. Wood-occupied PLA tends to clog easier when you have the temperature to a fault high, then falling it justified arsenic low A 180°C is a rational decision. Some black or white filaments use additives that take a bit more heat to flux nicely and may need as much as 220°C to print well. Essentially, start with 200°C and dabble with 5°C high or lower to find the abstract print quality for you.
With much a (relatively) low printing process temperature, PLA does not require an complete-metal hotend (a hotend that uses a thin walled heatbreak to keep heat in the warmer block and away from the heatsink) and volition work on just small with a PTFE-lined hotend (where the PTFE tubing passes the whole way through the heatsink and butts up against the nozzle). However, if your printer already has an every-gold hotend, don't worry as it's still perfectly compatible with PLA.
In the main, PLA is non-abrasive, but once you start playing with additives it becomes a case-by-display case basis. Sparkly filament isn't abrasive disdain having non-PLA material in it, but freshness-in-the-dark filum is harsh atomic number 3 the additive that glows will wear away at your nozzle before you're through even one spool. Wood-filled PLA doesn't tend to abrade brass nozzles, but often a 0.6mm is necessary to prevent the wood particles from obstructive the nozzle. An easy way to avoid these concerns is to swap over to an Olsson Ruby nozzle OR a Nozzle X when you want to use these materials.
Layer chilling is a must for PLA, in fact, there's nary such thing as "overmuch" cooling when IT comes to PLA. Many other filaments' only necessary for the cooling sports fan is for it to be revolved on for very short layers, but can stay off the rest of the clock time. PLA stays soft considerably longer than separate materials so your fan will drop most of its time at 100% power, and even then some models impress break when printed in pairs indeed on that point is enough time for the extruder to impress away from the part and give it time to cool.
Bed Requirements
Right off the at-bat, PLA doesn't actually indigence a heated bed. Naturally, having a heated up bed testament only makes things easier, but you can get by without one as long as you take the right bed surface. If you do have a heated have intercourse, just about 60°C is a groovy place to start and then you can adjust aside 5°C in either direction to get the adhesion you need. Some bed materials need more heat than others for PLA to hold fast, so experiment until you feel happy with your results.
A for the bed surface itself, you rich person quite a few options to act with: drinking glass, Buildtak, Buildtak PEI, GeckoTek, Wallop Bam PEX, or LayerLock Powder-Coated PEI are every viable options for your 3D printer's bed surface, and keep in intellect that's not an exhaustive list, just the big players. Let's take a consider each surface individually:
- Glass - If you want a glossy smooth bottom to your 3D prints, this is the way to go. Often you don't yet need self-sealing to get PLA to adhere to undraped glass but a trifle bit of adhesive solution can assistanc ringlet the print down.
- BuildTak - An adhesive sheet of paper you can apply directly to your 3D printer's sleep with or on top of a Flexplate. No resinous solution necessary, simply wait for your bed to cool and use a BuildTak spatula or twist the Flexplate to move out your print.
- LayerLock Powder-Coated PEI - A textured, flexible build control surface that fire add a unique look to your 3D prints. Make sure you already have a magnetic organisation in place for this to work properly and look at a quick besmirc of glue adhere help the PLA stick down solidly.
- BuildTak Ieoh Ming Pei - An adhesive sheet you can apply direct to your 3D printer's bed or along top of a Flexplate. In essence magic. Sticks solid when new and pops off with a gentle tap when cool. You may need to relegate the temperature ascending slightly to get sufficient adhesion to stick (near 70°C should be great deal).
- GeckoTek - An adhesive sail you can use directly to your 3D printer's bed Beaver State on top of a Flexplate. Useable in both a baking hot and cold discrepancy to better cause the capabilities that your 3D pressman has.
- Whack Bam PEX - An entire flexible bed system adhered to the 3D printer's bed. A strong magnet keeps the spring steel with an viscid sheet of PEX practical to IT secured to the printer's bed during the print, but can live easy remote and flexed to pop your print off.
There are always new and exciting methods for bed adhesion being developed, so it's epoch-making to cause a good grasp happening what each method is best exploited for. You can control out our 3D Printing Essentials article about bed surfaces to amply empathise the pros and cons of every make love surface you might come across spell 3D printing.
In addition to build surface upgrades, there are besides a extensive variety show of 3D printer adhesives that you can apply to your 3D printing machine's lie with to get a great initiative bed. These adhesives are specifically developed for the 3D printing industry, thus you can trust they have been tested to be reliable and honorable 3D pressman adhesives. Here are the champion 3D printer adhesives that you can use to get the best prototypic layer for PLA filum:
- Stick Stick 3D pressman adhesive
- Magigoo 3D printer adhesive agent
- 3DGloop! 3D printing machine adhesive
Almost 3D printer bed adhesives have the comparable instructions for use: apply a thin layer to the build surface where your actively 3D printing. Then, wait for your part to cool before removing - ready for your 3D printed part to unqualified makes it practically easier to remove, and certain adhesives will sometimes even "pop" the partly of the bed once cooled.

LayerLock Powder Coated PEI 3D printer soma surfaces are a great way to fix a solid first layer when 3D printing with PLA fibril.
Dynamical Your PLA 3D Printing Filament
When switching between 2 PLA spools and colors:
- Piece the extruder is cold set the heat to 120°C and wait for it to estrus up.
- When you touch 90°C, originate pulling on the filum until it in conclusion gives out and pulls all of the filament from the beak in one long, stringy strand
- If you are having trouble removing the strand, it's okay to raise it to 200°C and deal with purgatorial more filament to compensate.
- Increase the heat and load the new filament normally.
- Run the newborn color through the extruder until it runs clean and the new color is all that is forthcoming out of the extruder. If you are shift from a dark gloss (much as Shirley Temple Black) to a light color (like white or intelligent) play a while longer to be sure you don't have any dim contamination. Without this step it's possible to be a couple layers in and have the last bit of filament finally purge out.
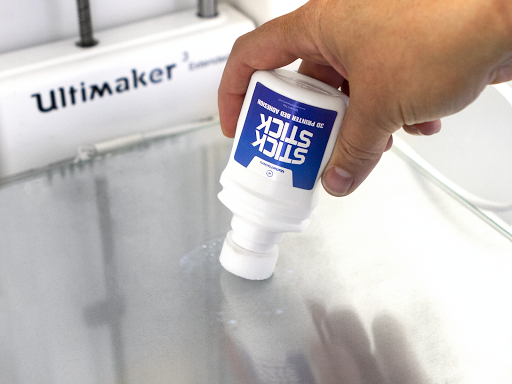
MatterHackers Stick Stick 3D printer kip down adhesive is a great solution for getting PLA 3D printed parts to "stick" to your 3D printer's bed.
Acquiring the Inaugural Layer of Your PLA 3D Printed Share Right
The early layer is the most probative part of any print - it sets the institution that the entire print builds on. You bottom look into the in-astuteness article happening how to get a perfect first layer here, OR for a brief summary of what to take below are the a couple of things you need to do to get the first layer to stick well.
- You require the print bed to be level.
- You need the nozzle to be the correct distance from the bed at the bulge of the 3D print.
- You need a good base material for your PLA to adhere to.
To a lower place is a video from MatterHackers' 3D Printing Essentials serial that will help guide you in the right direction for getting a stellar first layer. Therein television, we'll walk you through the steps mentioned above in detail so you can succeed when 3D printing process with PLA filament.
What to do When Things go Wrong When Using PLA 3D Printing Filament - PLA Filum Troubleshooting
In that respect are a few key things to check when your prints aren't on the job. But before we look at solutions we need to take in a brief description of your symptoms.
"I bathroom't tell if my printing temperature is right"What to Anticipate if you are having trouble getting your PLA strand temperature right:
- If the temperature is besides high
It's effortful to say there is unfeignedly a "too high." The biggest matter you may comment is that your overhangs droop substantially and that you have some extra stringing between the unaccompanied parts of your print A the extruder leaks out a half-size bit of plastic while moving betwixt separate areas of the publish. Improving the ability of the 3D pressman's level chilling lavatory help with your overhangs, and adjusting the recantation settings can move out the stringing. Additionally, in world-wide the hotter you print PLA the glossier the 3D print becomes. If you have the best layer temperature reduction and you know your retraction settings are well tuned simply you still have issues, then it's time to try bringing the printing temperature devour 5°C at a time. - If the temperature is too cold
You testament either see that the filament is non sticking to the previous level and you are getting a cacophonic coat (care the picture below), Oregon you will get a part that is not strong and can be pulled separated easily. In either case, you should increase the temperature aside 5°C and examine again until you get consistent extrusion and layers that fully stand by to each other. In contrast to printing too hot, the colder you print PLA the more matt it testament personify.
"I can't puzzle over the first layer to stick."
- Make dependable the schnoz is at the right height.
Check over the 3D printing process Essentials: Make love Leveling for what to look for in an ideal prototypical layer. - Make a point the print bed is level.
Check forbidden the 3D printing Essentials: Bed Leveling for best practices when leveling your bed. If part of the screw is too far from the nozzle and the other part of the bed is too close, filament can drag just about and make up compounding problems.
"The part has bad interior layers and top surfaces."
- Check the temperatures.
Make destined you'atomic number 75 printing process at the opportune temperature and that your kip down is the right temperature . Too cold on either of these and there won't be enough bond between the two surfaces. - Watch the filum tension.
Too loose and the extruder gears won't have the insect bite they need to push the filament around, likewise tight and filament can represent deformed and not extrude reliably. - Decent the filament campaign gear (if it looks clogged).
If you had a print flush it where the job continued but no filum was being extruded, then the drive train probably chewed a spot in the filum and filled its teeth with filament, reduction its overall clutch.
"The outdoors edges of my parts have lots of little bumps connected them."
- Make sure your printer is getting enough data.
If printing from a computing device, ensure that the computer is not too in use to fertilise the printer commands. If the printer is pausing it is usually overdue to the pressman being to a fault busy. - Print from SD card.
You put up vex approximately this by printing from an SD card. Sometimes this means you lose the ability to control the printer from your PC, but its a guaranteed right smart to get rid of your PC's hardware capabilities from the equation. - Root better PLA.
We have got launch that the quality of your black and white material can have a big affect happening the quality of your part. Acquiring best PLA can help you get better parts. Withal, don't beryllium too quick to take for granted the problem is in your PLA. With the right settings and longanimity hobbyists have succeeded in impression all sorts of materials many of which have very low viscosity and inconsistency. You should be able to flummox at least operable parts even with some lower berth quality filament. - Your retraction settings need tuning.
If your retractions settings aren't specify right, your printer could be overextruding after to each one retraction leaving little bumps at the location where it started extruding again. Play with the "extra restart distance" and see if that helps.
"Tall sections of my prints appear melted or squished together."
- Trip out "Cooling".
If your printer has a fan you should enable "cooling system" in the print settings. With PLA this should be at 100% in the least times except the initial layer - Mark more than one character at a time.
By adding to a greater extent parts to the build plate you are increasing the boilersuit cross territorial area of from each one layer, giving more metre for the separate objects to chilly than if they were printed on their personal.
"My printer will not put out any physical."
- Make a point your hot end is acquiring tasty.
See that the hot end is heating at all. If it is non you need to have your printer serviced. It is apt that you have a loose connection operating theatre your electronics take over been fried (assuming the printer is still connected and responding to your host software :). - Clean the effort gear and adjust tensity.
The first thing we are leaving to do is clean the filament moving drive gear and control that we have kosher tension against the filament. Usually improper tension or a clogged drive gear leave make the print wait more like the picture we consume for low temperature filament, but it sometimes does prevent extrusion all conjointly. Unsoiled the pinch wheel with a wire brush, and make sure your tension is good and solid (overmuch can also prevent extrusion and is more common with nonstop drives [the motor is directly connected to the drive gear] but less common with geared drives). - Remove the current fibril.
It may be that you have a small molecule in your extruder tip jamming the plastic. Use of goods and services the shift filament technique described above to pull down any particles that are in the extruder tip. - Chink for and remove jams 'tween the extruder and hot end.
This is the most extreme type of trouble because now it is time to take things apart. Sometimes heat can creep up the filament in the extruder and cause a bulge that then cools and prevents whatever further extrusion. This is usually at the junction between the extruder and hot end. Issue away the extruder and move out all the PLA you posterior (you Crataegus laevigata need the hot finish hot (80c-100c)to get all the material out. If you can buoy't get out each the filament by pull information technology out you may need to try and drive it polish through and through the hot end. We usually use a small Allen Stewart Konigsberg wrench. If this fails you posterior effort and recitation out the extruder or sizzling end but you may motivation to replace parts. Be sure to take precautions against being aghast or burned. If you are not qualified to do this work find someone who is, rather than risk injury.
Thank you for reading How To Succeed When Printing In PLA.
If you have any comments or contributions, please drop us an email or give us a call. We are always looking for tips, and best practices - and would love to hear from you. Palpate free to reach out with any specific questions on the MatterHackers Forum.
Joyful Printing! - MatterHackers
P.S. Check out our Filament Comparison Guide to obtain the scoop along all the latest and greatest filaments! Or browse the MatterHackers Store for all your fun filament needs.
how to clean the heat bed of anycubic i3
Source: https://www.matterhackers.com/articles/how-to-succeed-when-printing-in-pla
Posted by: haleaname1967.blogspot.com
0 Response to "how to clean the heat bed of anycubic i3"
Post a Comment